Partial assembly required…
As with most of our projects, this solar/battery upgrade isn’t as straight forward as we hoped it might be. We finally did receive the second set of batteries with the correct tops, but the wrong size nuts for attaching the tops to the batteries. Another phone call to arrange for replacements, more waiting. We also collected the second solar panel (which in some high winds, required taking the mothership to the dock once again); it’s now stashed next to the first panel in the port hull, making for an even tighter work space for the new battery compartment as well as for getting into the head which is forward in the same hull. Even waiting for the remaining bits, we finally had what we needed to begin the assembly. As usual with our boat projects, Mike is once again lamenting not having the “proper tools for the project”; he so misses his well equipped basement shop from our condo, but not the snow that surrounded said basement shop and condo. This project did however warrant a new tool.


Part of this project involved actually moving the batteries to a new location. We needed twice as much space for our new battery array, more than would fit in our Gemini’s original battery compartment, port side beneath the nav station. By moving them to the inboard storage area beneath the port settee, we were able to center the weight better, an important thing in a catamaran. Consequently we have to rearrange some storage, but that’s another day, another project. Mike built a framework to keep them in place as this storage space is neither level or square. Hard to tell from the photo, but they’re tucked neatly into an L-shape, preserving a fair amount of accessible storage space.
Having placed the batteries and snaked the monster-sized wiring (4/0, pronounced “4 ought”) from said batteries in their new location back to the battery switch in the previous battery compartment, next up was to assemble the connectors. Enter new tool… a hammer crimper. Yours truly’s job was to hold various bits in place while Mike pounded said bits vigorously with a hammer, which of course all took place while sitting on the sole of the boat. I’m happy to report that at the end of the day, all walked away uninjured.


Phase next of assembly was to load four lengths of aluminum, and a couple of buckets/bags of tools and misc bits into the dinghy, and haul it ashore to start construction of the support/frame for the solar panels. Thankfully the City Marina at Boot Key Harbor has some plentiful project space. We staked out a small area next to “Stitch”, the local live aboard/canvas guy and some others working on various projects and got to work. Step one was cutting the aluminum to the proper lengths, specifically 4 lengths of 6061-T6 aluminum 1″ x 2″ x 1/8″ rectangular tubing. A plastic miter box , a set of clamps and a hacksaw were not the ideal tools for the project, but that’s what we had; we muddled through a couple of cuts. Kudos to Alex of Sea Tek, another live aboard who makes a living doing such projects, who witnessed the struggle and loaned us his compound electric miter saw to finish the remaining cuts.


Step two, with the proper lengths cut, was to measure, mark and drill about a gazillion holes of various sizes that need to be in very specific locations and very specific alignment. Our mantra for the day: Measure twice (or two dozen times), drill once. A good while later we had four bars, drilled with a total of 60 holes of sizes varying from 1/4″ to 3/4″ . The cardboard, by the way, is our solar panel template. Pretty high tech, huh?
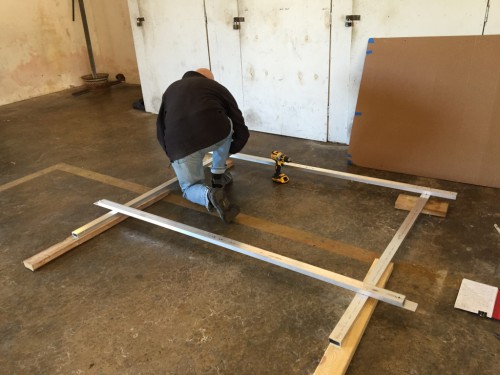
laying it all out
Next up, some filing away of the rough bits. Most of this step required the use of small metal files to clean up the holes, and larger files for the bar ends, all by hand. A short time later though, another fellow cruiser who was constructing a whisker pole, offered the loan of his angle grinder to sand/clean up the bar ends. Note the creative use of a director’s chair in the photo below. And by the way, this guy’s hair is really jet black; he’d been grinding PVC with the aforementioned grinder prior to this photo being taken.
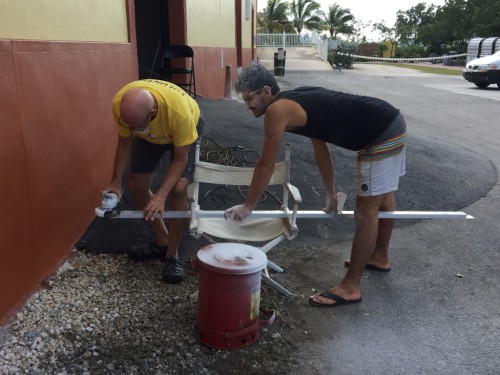
with angle grinder and director’s chair
Although we still love the more remote anchorages, there are definite advantages to being in a place like Boot Key Harbor, dense with cruisers, many of whom are DIYers who are more than willing to share their experience, expertise and tools. It’s not accidental that we picked this place to tackle this project.
Phase next: Taking these various bits and pieces back to the mothership to begin putting the puzzle together in place, hanging off the stern of the boat, over the water that’s just waiting to collect stray bits, tools, and fasteners that may get dropped in the drink. Here’s hoping for some light winds and calm seas.
As always, stay tuned…

Now as I recall those batteries would give off hydrogen gas while charging, so some ventilation would probably be a good idea . Just say’n. Remember the Hindenburg? The new one located in the boot of my Miata has little rubber vent tubes……….
Stevie, stop scaring my mother…
Au contraire, mon ami, AGM batteries don’t off-gas appreciably. In any event, the new compartment has loose-fitting sliding doors, so I think I’m OK. Thanks for your concern.
But does the Captain pass gas………….?
Actually early Miatas, and probably the newer ones, come with AGM batteries that were equipped with vent tubes. I have gone to a standard wet cell, more CCA’s, cheaper, and longer lasting than the current junk lawn tractor AGM’s they sell for Miatas.
Bending 4 oh wire must have been a treat! It was stranded wasn’t it?
The Captain says “Absolutely, a gazillion hair-fine individually tinned strands”… whatever that means. Something about marine wire and vibration…
Wow, what an undertaking Best of luck and hope it all comes together so.
Looks like fun but thank god for friends with tools! As my dad always used to say, “you’ve got to have the right equipment”.